

A
Solaris and Linux Utilities
This chapter describes utilities provided in the Solaris and Linux versions of the CodeWarrior IDE. These utilities are accessible from the Info menu on the right-hand side of the menu bar in the IDE windows. This menu is only available in the Solaris and Linux versions of the CodeWarrior IDE.
The topics covered in this chapter are:
Copy Files Accessory

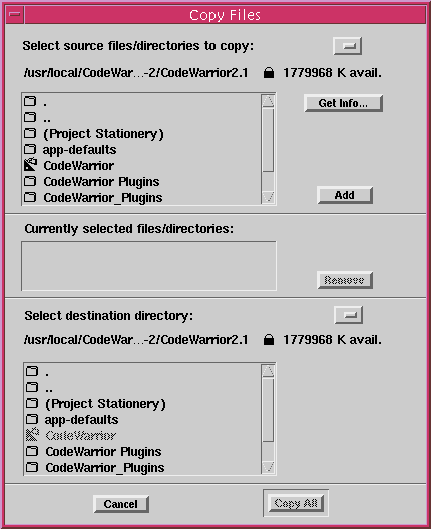
When the Copy Files menu item is chosen, CodeWarrior launches a desk accessory which enables you to copy files and folders between file systems or devices accessible in your Solaris and Linux environment from within the CodeWarrior IDE. This includes Macintosh diskettes, AppleDouble, K-AShare, EtherShare, and Partner file systems, and NFS-mounted UNIX files systems. For example, you can use Copy Files to copy a file from a Macintosh diskette into a UNIX directory.
To display the Copy Files dialog box (Figure A.1), choose Copy Files... from the Info menu.
Figure A.1 The Copy Files dialog box

This dialog box contains three sections: Source File/Directory Selection, Currently Selected Files/Directories, Destination Directory Selection
Source File/Directory Selection

This area of the dialog box is used for selecting files to copy from the source volume. It contains the following items:
Path Display
The path display shows the path to the current directory being listed.
Free Space Display
This display shows how much disk space is available on the currently selected volume.
Source File/Directory List
This is a scrollable list of files in the current directory. Double-clicking a directory or volume in the list displays the contents of that directory or volume. Double-clicking a file adds it to the list of files to be copied. Only one item can be selected at a time.
Get Info Button
Pressing this button displays a dialog box that provides file information about the currently selected file or directory in the File/Directory List. If no file or directory is currently selected in the list, an alert message appears with instructions.
Add button
This buttons allows you to add the directory, volume, or file currently selected in the source directory to the list of files to be copied.
Currently Selected Files/Directories

This area of the dialog box is for viewing the files you have selected for copying. It contains the following items:
Selected Files/Directories List
This list displays the truncated path(s) of the file(s) to be copied. As entries are being copied, they are highlighted. After a file is copied, it is removed from the list. If an error occurs during the copying process, the copy is aborted and the list displays the names of files that have not yet been copied.
Remove button
Pressing this button removes the selected files/directories from the Source Files/Directories List.
Destination Directory Selection

This area of the dialog box is for setting the destination directory where files will be placed. It contains these items:
Destination Path Display
This display shows the path to the currently selected destination.
Free Space Display
This display shows how much disk space is available on the destination volume.
Destination File/Directory List
This is a scrollable list of files in the current directory. Double-clicking a directory or volume in the list displays the contents of that directory or volume.
Cancel Button
Pressing this button closes the dialog box without performing the copy operation.
Copy All Button
Pressing this button starts the copy procedure. You are first prompted by a notice to verify the destination directory. Once you verify this, the copy proceeds.
File Systems Facility

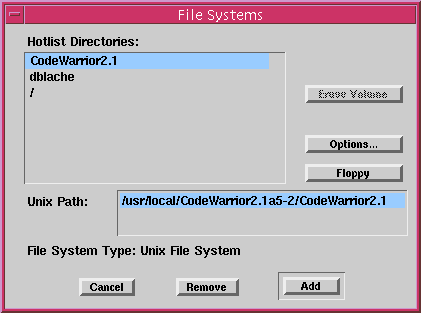
The Solaris and Linux versions of the CodeWarrior IDE provide the File Systems Facility, which enables you to mount volumes on your workstation. When the File Systems menu item is chosen from the Info menu, the File Systems Facility dialog box is displayed (Figure A.2).
The File Systems Dialog Box

The File Systems dialog box contains the following items: Hotlist Directories, Erase Volume Button, Options Button, Floppy Button, Unix Path Text Box, File System Type Display, Cancel Button, Remove Button, Add Button.
Figure A.2 The File Systems dialog box

Hotlist Directories
This list shows all of the volumes currently mounted on your system. You can select any volume listed and then unmount or erase it, or display the volume's full pathname and file system type, according to the options you choose below.
Erase Volume Button
Pressing this button deletes all files in the chosen volume.
Options Button
When this button is pressed, the Options dialog box is displayed. This dialog box lets you set line breaks in files you mount. See "The File System Options Dialog Box" on page 664 for more information.
Floppy Button
Lists any diskette in the diskette drive (in the Unix Path field) and enables the Mount button.
Unix Path Text Box
This text box contains the full UNIX pathname of the chosen volume. If no volume is currently chosen, you can type a path into this area to mount a volume by its path.
File System Type Display
This display shows the type of format for the chosen volume-UNIX or HFS.
Cancel Button
Pressing this button closes the dialog box without mounting any file systems.
Remove/Eject Button
If the chosen volume is on a hard drive, this option unmounts it. If the chosen volume represents a diskette, this option ejects the diskette from the diskette drive.
Add Button
Pressing this button mounts the currently selected volume. and closes the dialog box.
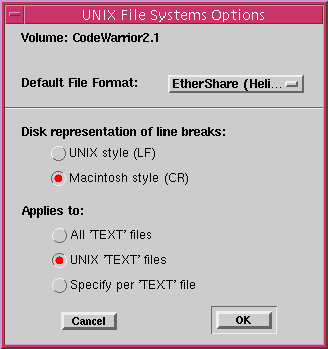
The File System Options Dialog Box

Some applications may have difficulty representing line breaks appropriately as their files move from foreign operating systems to UNIX systems. The File System Options dialog box enables you to solve this problem by explicitly choosing how to represent line breaks in certain types of files. To view this dialog box, press the Options button described above.
Figure A.3 The File System Options dialog box

This dialog box contains the following items: Volume Display, Default File Format, "Disk representation of line breaks" button group, "Applies to" button group, Cancel button, OK button.
Volume Display
This display shows the name of the volume which will be affected by the settings in this dialog box.
Default File Format
This popup menu lets you specify the file format for any new files that will be created on the volume in question.
Disk representation of line breaks
This group of buttons determines how the IDE will convert line break characters when it reads or writes files on the current volume.
UNIX Style (LF)
If this option is chosen, line breaks are replaced with line feeds whenever a file on the current volume is read or written by the CodeWarrior IDE.
Macintosh Style (CR)
If this option is chosen, line breaks will be replaced with carriage returns whenever a file on the current volume is read or written by the CodeWarrior IDE.
Applies to
This group of buttons determines which files will be affected by your settings in the File Systems dialog. Only one of these buttons may be selected at a time.
All 'TEXT' Files
If this option is selected, conversion will be applied to all text files read or written by the IDE on the current volume.
UNIX 'TEXT' Files
If this option is selected, conversion will be applied only to UNIX (non-Macintosh) text files read or written by the IDE on the current volume.
Specify per 'TEXT' Files
If this option is selected, a dialog box will be displayed each time a text file is read or written by the IDE, allowing you to specify how line breaks should be converted for that file.
Cancel button
Pressing this button dismisses the dialog box without applying any settings.
OK button
Pressing this button applies the selected settings and dismisses the dialog box.
Keyboard Preferences Dialog Box

Modifier keys are used in combination with other keys to generate keyboard shortcuts to certain IDE functions. For instance, to execute the Ctrl/Command - N keyboard shortcut, you depress the Ctrl or Command modifier key, and while holding it down, press the N key on your keyboard.
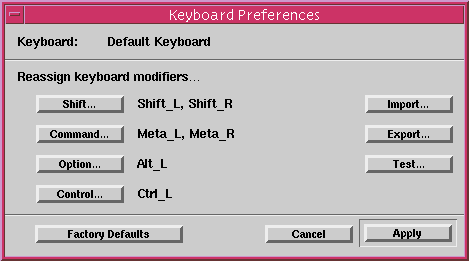
The Keyboard Preferences dialog box (Figure A.4) allows you to define which physical keys on your keyboard correspond to certain modifier keys used in the CodeWarrior IDE. To display the dialog box, choose Keyboard Preferences from the Info menu.
Figure A.4 The Keyboard Preferences dialog box

This dialog box contains the following items: Keyboard Display, Reassign Keyboard Modifiers Section, Import Button, Export Button, Test Button, Factory Defaults Button, Cancel Button, Apply Button.
Keyboard Display
This display shows the active keyboard.
Reassign Keyboard Modifiers Section
The Shift, Command, Option, and Control buttons in this section correspond to modifier keys used in the CodeWarrior IDE.
Pressing one of these buttons will cause CodeWarrior to scan the keyboard and record keys that are pressed until a key is released. The key(s) that are pressed during the scan will be mapped to the corresponding modifier key. Once scanning is complete, a list of keys that were pressed will appear to the right of the button.
Once the Apply button is pressed, the changes you have made go into effect. From this point on, when you type any of these keys, CodeWarrior will respond as if the corresponding modifier key has been pressed.
For example, to map both the left and right Shift keys on your keyboard to the Shift modifier key, follow these steps:
1. Press the Shift button in this dialog box.
2. Press and hold down both of the Shift keys on your keyboard.
3. Release the Shift keys on your keyboard.
Shift_L and Shift_R should now appear next to the Shift button in the dialog box.
Import Button
Press this button to display a file open dialog, which will allow you to select a file to import keyboard modifier settings from.
Export Button
Press this button to display a file save dialog which will allow you to export the current keyboard modifier settings to a file on disk.
Test Button
Press this button to test your settings.
Factory Defaults Button
Press this button to reset the settings to the factory defaults.
Cancel Button
Press this button to dismiss the dialog box without applying your changes.
Apply Button
Press this button to apply any changes you have made and dismiss the dialog box.


Visit the Metrowerks website at: http://www.metrowerks.com
For assistance contact Metrowerks Technical Support at: support@metrowerks.com
Copyright © 1999, Metrowerks Corp. All rights reserved.
Last updated: May 24, 1999


